
Pixinsight is well known for its process-oriented work environment that allows the application of processes to images regardless of the previous state of the image. This leads to the frequent use of some processes during each imaging set, as well as processes with many settings tweaked for your own needs (such as with ImageIntegration, StarAlignment and MultiscaleLinearTransform). This has led to many people wanting to be able to save a set of process icons to use every time PixInsight loads. Although PixInsight already offers the option to save sets of process icons, you can also set up the program to load any sets that you want on startup, even if you don’t select the set to launch the program!.
What it Looks Like
To begin, go the process menu and, one by one, open the processes you like, edit their settings in ways that will help you in the future (I know I like to set up multiple recurring settings on a lot of these processes), and drag their triangular handles to the workspace so it becomes populated with the desired processes. Name them as you like. When we ultimately save the configuration, it will include the icons, their names, and their locations in the workspace! Here is my example workspace, populated with my process icons that will be loaded every time:
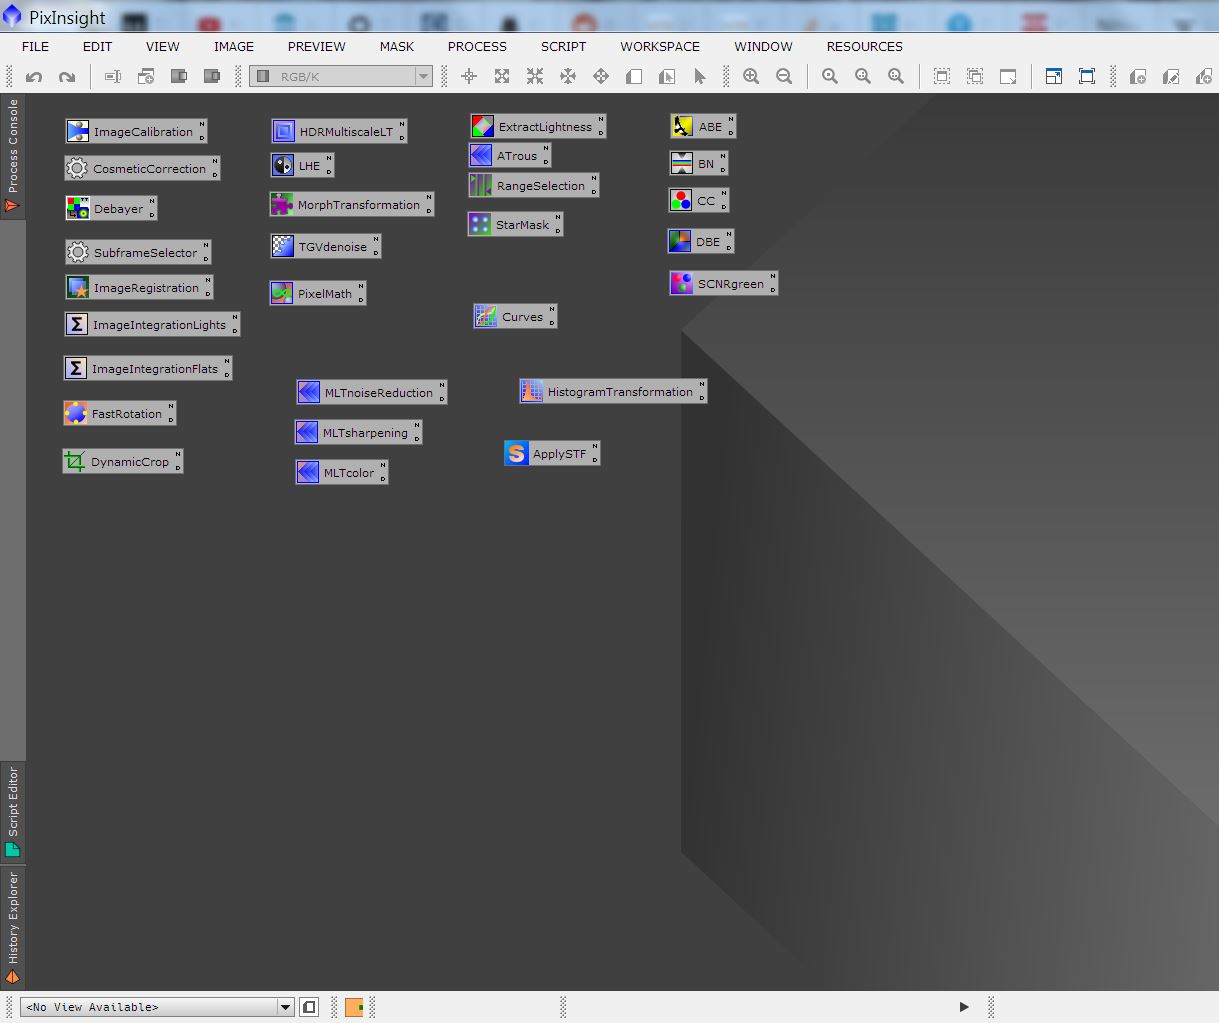
I have actually organized these in a nice way for myself, with preprocessing tools on the left, then mask tools, non-linear processes, linear processes, and a few stragglers. Once you have the layout and icons the way you like, you’re ready to have this configuration load every time PixInsight launches!
How to Save the Layout
Saving this layout is as simple as choosing the “process>process icons>save process icons” option. You can also save only some of your loaded icons by clicking in the workspace and dragging across all of the icons you want to save, which will highlight them. Then, right click on one of them and choose “save selected icons” so you can export all of the selected icons as a single pack.
If you’re planning on having this configuration load at startup for a long period of time, save it somewhere outside of the PixInsight folder on your machine so that it doesn’t get obliterated if you uninstall or possibly update the program. Remember where you stored it so you can tell PixInsight to load it every time it starts. We’ll use this next.
How to Load Icons at Startup
Newest Version 1.8.9-1 (Current as of June 2023)
The older strategies below this one are no longer workable on this version of PixInsight because any code that runs automatically must be signed by a trusted developer (or the user, which we’ll take advantage of here). Since this software can run a very wide array of additional software, allowing any scripts to run unsigned at startup can be very dangerous. Therefore, any non-included code must be signed by a trusted entity. It’s a pain, but for legitimate security reasons.
That being said, you must do the following to load the desired icon set at startup:
- Produce signing keys based on your PixInsight paid license information
- Link them to your local signing identity
- Create the desired startup file
- Sign the startup file you’ll be adding to the startup routine with your keys
- Add the file to the PixInsight startup folder to run at startup
Then the software will allow the loading of your custom script at startup. Let’s begin.
1) First, enter “Script>Development>Signing Keys”. We want to activate “Generate Signing Keys” and choose “Local Signing Identity” because these keys are specific to you, based on your activated license. For more on the software signing implementation, see the documentation here. All we need from here is under “Output”, to choose the location and name for your signing key (place it in your own folder that is separate from the PixInsight software files so it isn’t destroyed if you update or reinstall- you can use the same folder you used above for the icon file!) Any name will do with the correct suffix. Finally, implement a secure password that is required to decrypt the keys. A weak password means theoretically, someone else could start signing bad code with your keys if obtained and decrypted. Choose “run”. These keys will be used by you to sign any custom scripts or processes you make.
2) Link these keys to your installation of PI. Choose “Script>Local Signing Identity”. Load your generated keys from the previous step and input your password. Check “Make the local signing identity persistent” to make this a one-time process. Choose OK.
3) Create the startup file that will point to your icons you made before. Open a text editor and create the text file “startupIcons.scp” or whatever you want to name it (still with the scp filetype though). We need two lines in this text file. The first line tells PI the ID for this script so it can link it to the signature. Choose any name you’d like that isn’t likely to be needed again. I chose “my_startup_icons”. In that case, place the following line in your scp file:
#script-id my_startup_icons
Next, the command to open your previously generated icon files.
.open /path/to/icon/file/made/above/YourIconFile.xpsm
The syntax depends on your operating system. For linux, start with the directory after /home/yourusername because PI will add this automatically, at least in my build. For Windows, I believe you should start with C: and continue from there. Also update the code above to give the actual name you assigned to the icon file.
Now save this two-line .scp file somewhere (on linux, don’t save it where root privileges are needed yet or you can’t sign it!), probably where you saved the icons and the keys.
4) Now we need to sign the above file with your keys. Choose “Script>Development>CodeSign”. Add your file to the list. Choose your key file you made earlier. Enter its password. Choose “run”, and see if it was successful in the console. If so, you’re ready to use your script! You should now have a .xsgn file with your script too.
5) Move the .scp file and the corresponding .xsgn file to the PixInsight startup folder. On Linux, this is the folder chosen in the installation script (as of now, the default is “/opt/PixInsight/” and you must do so in the terminal as root). On windows, it’s the “Program Files” directory. I still don’t care about apple 😉
Enter “PixInsight/etc/startup” and add your .scp and .xsgn files to the folder, which should already also contain a different file called “startup.scp”. Load a fresh instance of PI and you should see it load your icons in the console! Check its report for any errors. Most likely would be signing errors (you can’t change the file after it’s been signed!!) or a syntax error on your icons location in the .scp file.
Older Version 1.8.9 (Deprecated!)
This solution applied before version 1.8.9-1 when the code signature implementation was incomplete. This does not work on newer versions of PI.
Navigate to the “Program Files” (Windows) folder where PixInsight is installed. On Linux, this is the folder chosen in the installation script (as of now, the default is “/opt/PixInsight/”). I don’t care about apple 😉
Inside of the “PixInsight” folder, navigate to “etc/startup/” This folder should contain the “startup.scp” file among other things. Create alongside it a blank text file called, for example, “startupicons.scp” (in linux you’ll need root permissions). Open this file and add the following text to it:
.open /path/to/icon/file/made/above/YourIconFile.xpsm
Adjust the path and filename correctly to suit your needs and save the file. Note that all scripts (such as this one you just made) that are in this folder will automatically run at startup.
You should now have PI open the same set of process icons whenever you start it up, even without clicking on the icon file itself! You’ll probably need a reboot of the program to initiate this change. And that’s it! Enjoy this new, handy functionality.
Older Versions (Very deprecated!)
Inside of the “PixInsight” folder, navigate to “etc/startup/” and open the “startup.scp” file with a text editor. Scroll to the end of the file, and you will then add a line near the end of the file, in the following location, with the following text (modified to your needs), shown within the red parentheses:
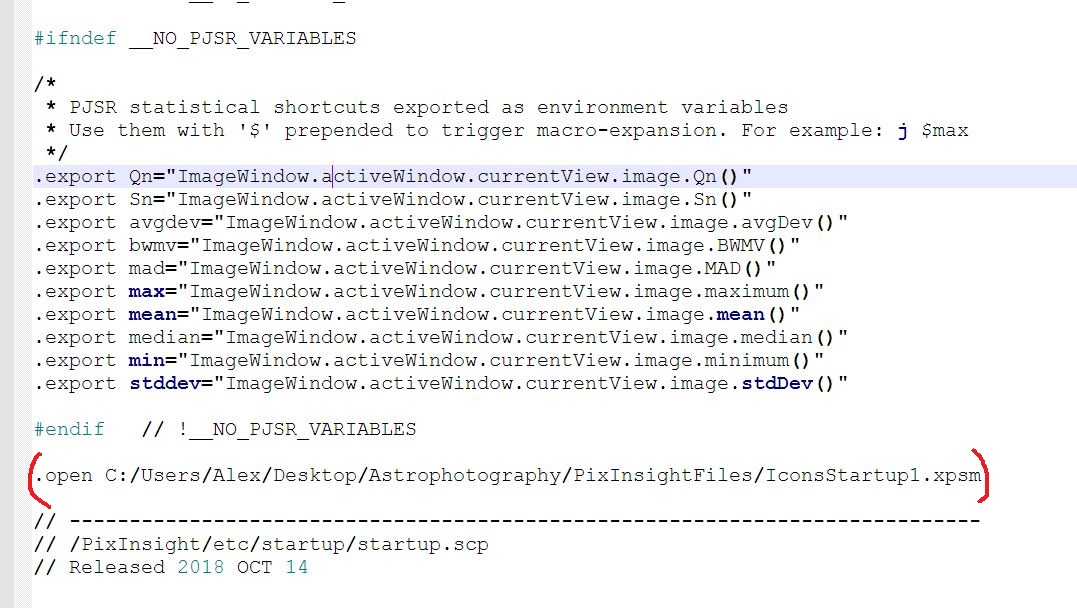
Change the first part of the code to match where you saved your process icon set file that you saved before. The very final part is the name of the process icon file.
cara deposit pulsa joker123 says:
Way cool! Some extremely valid points! I appreciate you writing this write-up
plus the rest of the site is very good.
Stphanie says:
Hey there! This post could not be written any better! Reading through this
post reminds me of my old room mate! He always kept
talking about this. I will forward this page to him.
Fairly certain he will have a good read. Many thanks for sharing!
hdfilmcehennemi says:
Fullhdfilmizlesene ile en yeni vizyon filmler Full HD ve ücretsiz film sizlerle. Orijinal film arşivimizle en kaliteli film izle fırsatı sunuyoruz. Monty Goehner
Hottest Hairstyles says:
Yesterday, while I was at work, my cousin stole my apple ipad and tested to see if it can survive a forty foot drop, just so she can be a youtube sensation. My iPad is now broken and she has 83 views. I know this is totally off topic but I had to share it with someone!
Rick Harris says:
Thank you for this process. For Apple it’s all the same except directory- start with the /Users/yourusername.
Rob says:
Thanks Alex, I’ll take a fresh look at it.
Rob says:
Hmm I did exactly as described in the updated article but get the error. When saving the project the ‘signed’ box is greyed out and also the project is saved as .xosm not xpsm, this make a difference?
Thanks,
Rob
Alex says:
Not sure what you mean by saving projects, pixinsight projects use the .pxiproject suffix.
It’s possible the absolute most recent version (1.8.9-1) has more thorough startup integrity requirements than 1.8.9 on which I tested this, however I won’t be testing that just yet.
Edit: It does. Updated!
But it sounds like you’re saving projects anyways, which doesn’t seem relevant to this issue
Rob says:
Hi Alex,
Completed the steps as above on PI version 1.8.9-1 and I get “*** Error: Required code signature not found: C:/Program Files/PixInsight/etc/startup/Startupicons.scp”
What’s the solution to this please?
Rob
Alex says:
Hey there, this is now addressed in the updated article, thanks!
Benny says:
I put the “.open” line in a new, empty .scp file (just a text file, use any editor – I like Notepad++) that I copy into the etc/startup folder after editing. That way:
– I’m not editing files of PI itself (which can give issues with patch upgrades)
– I can edit the file without admin rights (until I copy it)
– I can quickly restore the situation when doing a full upgrade of PI (which tends to fully reset the PI directory)
Alex says:
Yeah I’m a big fan of options that don’t get destroyed when the software is updated!
Rob says:
Sorted it Alex! I had the .open line before the #endif command so moved it to after the #endif but I don’t have an .xpsm file at all but I have “project.xosm” which works!
Thank you so much for this fix it’s been annoying me for about 6-months 🙂
Jason Dain says:
You should mention that on a windows box you need to open Notepad as an admin to be able to save the edits to the file.
Rob says:
Hi, I dont have an .xpsm file, no problem editing and saving the file but I’ve tried a number of permuations but it either gives an error or does nothing.
Antman says:
THANK YOU!!!!!! OMG so annoying loading them every time i start the program!