Table of Contents
DSLRs and other “daytime” cameras (such as mirrorless, etc.) are popular choices for astrophotography (especially for imagers with less experience) for many reasons; they are relatively cheap nowadays, they have multiple uses including for normal photography, many people already own them before pursuing astrophotography, and they are less complicated than dedicated astro cameras (although not by much). For these reasons, there are many who use them for astrophotography and many software and hardware offerings exist to allow their usage on various telescopes and mounts. However, there are also downsides, some of which are insurmountable. I’ve concluded that for testing the process of astrophotography, or for beginning levels (and some intermediate levels) of astrophotography, Nikon DSLRs are a great choice, especially for those who already own them. For deep integrations (where a large amount of data is collected) and more serious work, however, they are essentially unworkable at the higher levels for reasons that are beyond the control of the advanced user.
What about Canon? Other Brands?
Most of the following will properly pertain to Canon and other brands of camera as well. It is generally agreed upon that Nikon DSLRs, with their optimized Sony sensors (Canon makes their own, which is a tough endeavor), are slightly better for astrophotography because they offer lower noise, I believe particularly in the read noise category. I’ve seen side-by-side comparisons of integrations between the brands, and the Canon equivalents are certainly noisier, although not to the point of being unusable of course. However, if one were looking to purchase one to use for astrophotography of deep-sky objects, I would definitely recommend Nikon. (Planetary might be different, as one needs a 1:1 video cropping mode to properly use the sensor for this job, and I believe Canon offers this on various models, although dedicated planetary cameras are literally cheaper for better results and so are always the better choice).
Other brands can be even harder to use effectively because of necessary software support, as well as other bizarre artifacts that are well-documented, many of which I’ve heard from Sony brand cameras (the bodies and software, not the sensors).
Summary
So is a DSLR or similar camera workable for astrophotography? After my many years of experience with various Nikon DSLRs before recently upgrading to a dedicated cooled astro camera, here is the breakdown:
- For beginners or those experimenting early on: yes!
- For those imaging wide-field and/or with lenses: probably!
- For intermediate astrophotographers: maybe, but not if you want the best results while you work up to advanced imaging.
- For advanced astrophotography, usually through a good telescope: no, unfortunately not.
In short, Nikon has multiple problems with the way they treat the RAW data before writing the NEF files, which leads to artifacts and problems with calibration that are not solvable except with coping mechanisms retroactively (such as background extraction of harsh artifacts, etc.). This strongly limits the amount of stretching that one can get away with when stacking images taken with DSLR raw files and introduces problems that cannot be solved by the user, only coped with. Most images taken with DSLRs (and many can be very good, no doubt, but they rarely compare to their dedicated, cooled astro camera counterparts, and for good reasons) will generally have one or many of the following shortcomings as a result of these effects, whether knowingly or not: clipped lowlights (unrealistically blackened background), blown out stars (ISO values higher to compensate), missing faint detail (often attributed to light pollution but also can be from gradients/patterns that have to be suppressed), and splotchiness, often colored (from aggressive background extraction). They also suffer higher noise (lower quantum efficiency and higher read noise than most dedicated cameras) and dark current (because matching the temperature of dark frames is impossible to do perfectly and therefore so is removing it perfectly), although these two serious problems aren’t even as bad as the former ones!
The reason these problems don’t render DSLRs unusable for all types of astrophotography, particularly for beginners, is because sometimes they’re subtle enough to not ruin images of lesser quality. There’s nothing wrong with taking less advanced images, however those images that contain, for example, a very small galaxy in the center of the frame, with poor tracking/guiding of the telescope, bad colors, blown out stars, and very high noise, tend to not be advanced enough yet to display some of the issues I describe later in this post. I’ve seen many say “I don’t see any issues in my images!”, only to show images that are not of a quality that runs into this bottleneck yet. That’s totally fine, however once all of these issues are resolved by more advanced imagers (guiding and tracking, seeing conditions, light pollution perhaps, backfocus distances, reflections in the optical train, large integration times, properly performed calibration, and good post processing- what a list!), Nikon DSLRs really start to show their deficiencies, some of which are absolutely unsolvable. Users who have spent hundreds of hours in conquering the above issues will be very disappointed to find the results are still not as good as they could be upon ditching the DSLR, for the reasons I’ll discuss below. Therefore I must recommend moving to a dedicated camera for advanced work. Even if not for the lower noise, reliable dark temperatures, and higher quantum efficiency (usually), then definitely for access to truly raw data. This is ultra-important. Intermediate photographers will have mixed results here and may find DSLRs acceptable for their standards, whereas others will not.
For those imaging with lenses or at very low focal length, there are two reasons why DSLRs are still very viable options (if not outright advantageous given their compatible lenses). First, some of the software modifications to the raw data are more helpful (or at least less destructive) with lenses attached. After all, these cameras are technically intended for daytime imaging using these very lenses, so they’re optimized for this use case. Secondly, gradient extraction tends to be easier across higher FOVs; plenty of background is present in the image from which to sample, thereby helping deal with some of the other issues.
It is my understanding from various testimonies out there that these same issues I’ll discuss are also present in Canon and Sony cameras, although I have no direct experience with them myself. Some of them also have additional issues that the Nikons don’t have, such as star destruction, split-sensor artifacts (some Nikons have this too), and aggressive banding. These can absolutely ruin advanced images.
DSLR Intrinsic Advantages
Because this part is simpler I’ll start with the advantages of DSLRs and their mirrorless counterparts.
- Many people have them sitting around already. In this case, you might as well buy a cheap attachment adapter and get to work if you just want to wet your beak! If you want to get right into more advanced imaging and you’re ready to devote the time, however, I don’t recommend using the DSLR for long. The gold standard is a cooled astro camera, whether color or mono.
- They are generally cheaper, although not always! You can get a very good dedicated color camera for the price of a mid-level DSLR at this point.
- They give you color immediately without filters. Dedicated mono cameras are more complicated to use because of the filters; focusing, alignment and other factors become more laborious.
- Their preview screens on the back are admittedly very handy, both for aligning the go-to on the scope and also for taking flats on the spot…
- The RAW filetype is easier to work with and preview on non-astro programs. Previewing fits files of dedicated cameras is more cumbersome.
- The RAW files are typically smaller in file size (although ironically some types of compression applied to DSLR raw files often cause the artifacts I’ll describe soon!) Although my NEF files were 21MB compared to 50MB for the FITS files on my cooled camera with similar resolution, this is a necessary price to pay for advanced imaging; the compression nikon uses can cause unsolvable problems!
- Can be used for other photography with those nice lenses you might already have!
DSLR Intrinsic Disadvantages
Before I get to the main issues with the raw data tampering with Nikon, here are other reasons these cameras are intrinsically inferior to their dedicated, cooled counterparts:
- Mechanical mirror and/or shutter movement, which some say hurts their images. Consider exposure delays here. Astrophotography also mechanically wears on the camera with low exposure times (more subs) given the mirror and shutter movements that occur each time.
- Higher read noise, almost always. I used the D5300 for many years, and it has one of the lowest-noise sensors available for that level of DSLR. Almost surprisingly low. Still, upon comparing it to my new ASI2600MC, it’s not even close! Partially because of the new cooling, and also the lower read noise of this dedicated cam, the old images look noisy compared to the new ones. And that’s on a DSLR with an impressive sensor!
- No cooling without modding/paying for it. The colder the sensor, the less noise introduced from thermal variations falsely “triggering” an event at the photosite without a photon hitting it. I never modified my DSLR or cooled it, which I’m sure would’ve reduced noise from dark current contributions, but in my opinion this is not a very reasonable venture. For the cost of doing so, and that of the camera itself, you might be getting close to getting a much better dedicated camera anyways! It is also impossible to perfectly match your dark frames to your light frames without modding because the sensor will be continuously and gradually changing temperature (usually cooling down) throughout the night. No particular temperature for dark frames will correctly account for this. This is a smaller issue for beginning images or those with only a few hours of total exposure, however.
- Generally, lower quantum efficiency and full-well depths. Although I won’t be discussing these in detail here, in short, the quantum efficiency is the percentage of photons that hit the sensor which get converted into a recorded “hit” in your final data (sometimes the process simply doesn’t make it all the way to the end properly- this is for quantum mechanical statistical reasons). A dedicated camera with a higher quantum efficiency will have the effect of giving you longer exposure times for “free”, as more of the target photons get counted in a shorter amount of time. Lower quantum efficiency literally wastes some of your time. Note that some DSLRs actually have QE values that rival some dedicated cameras because this is a feature of the sensor itself. Be wary of reported values here however because they are usually maximum values (QE varies with light frequency). Full-well depth is the maximum amount of photon “hits” that can be recorded before the “max” value is reached; hits beyond this point won’t be counted, meaning you now lose information (detail) beyond this. Higher full-well depth means less saturation in stars.
The Big DSLR Problem- RAW Data that’s Quite Cooked!
It is very well-documented by Mark Shelley how various camera manufacturers perform corrections and modifications to the data before it gets written to the RAW files which, under certain common astrophotography circumstances (dim fields and strong gradients like vignetting, or small features on the order of single pixels, i.e. stars), can lead to the destruction of stars, or terrible artifacts that are very difficult or impossible to prevent. These can include colored concentric rings and wave-like patterns in final stacked images which can completely annihilate the usefulness of the entire stack.
These “corrections” include a compression algorithm that can lead to data loss in raw files and therefore strong color artifacts, a color correction that likely pertains to lenses and their documented optical imperfections, and potentially others too. They are well-intended changes, but only for the typical user of the DSLR: someone using a lens on a daytime shoot with a fairly bright target. Such contexts will be improved by these optimizations. Astrophotography can be destroyed by them. As mentioned above, beginners will have more things to work out than these so they might not be impeded by them because their data might not be stretched enough to reveal the problems. Intermediate imagers should carefully consider if they want to deal with these problems. Advanced imagers will not be satisfied with Nikon DSLRs for astro work aside from certain low-FOV or lens applications.
As mentioned above, I have no direct experience with other brands of DSLRs, however I know for a fact that certain Sony cameras cause issues, and it appears from many individual reports that Canon likely applies similar modifications to their RAW data. Advanced imagers require perfectly raw data, because the resulting stretches are aggressive and sensitive. 0.1% deviations become glaringly obvious under these circumstances.
Nikon Lossy Compression
Because this is well-documented and explained at Mark’s website, I’ll keep my explanation of these phenomena brief and just focus on a few examples. In short, Nikon implements a compression algorithm that is actually lossy when writing the RAW file (to reduce the filesize), meaning that when decoded later, some data is not recovered. Only lossless compression reduces the filesize without losing any information. Frankly this is ridiculous because the raw data should be raw, but I digress. Now, what happens is the algorithm “bins together” hits at certain ADU values as the values at each photosite get larger (the idea being that with daytime subjects, minimal meaningful information is lost here because things are bright anyways). This creates patterns (“notches” or “teeth”) on the RAW histogram of under- or over-representation at certain ADU values. When this otherwise subtle fault is coupled with vignetting (which would also otherwise not be an issue when using flat frames), the radial falloff in light intensity causes rings of color where the under- or over-representation boundaries are located. Think of a stair-step pattern, but wrapped around the center of the image. Additionally, the flux of light hitting the sensor is different across the three color channels, so the rings are colored in nature, because the pattern occurs in different locations across the three channels.
When we integrate hours and hours of data, incredibly small changes from pixel to pixel really shine through in the final result (as desired!), so even corruptions as small as few analog to digital units can be seen in the final result if the pattern is uniform enough. Therefore shorter integrations won’t suffer as much because the noise in the image buries the effect. However larger integrations will see the issue more and more, hurting advanced images even more. Dithering only diffuses the rings but doesn’t remove them altogether.
This problem is not solved with flat frame calibration either, because the locations on the histogram in which the improper binning leads to sudden ADU deviations are not uniformly distributed across the histogram spectrum. This means the flat frames will get rings in different locations than the light frames will unless your flats are exposed to exactly the same ADU values as your lights throughout the entire image, which is a practical impossibility (and also would underexpose the flats if it were even feasible). Furthermore, proper flat calibration can even introduce the rings into the data if it contains rings that the light frames don’t. This problem is unsolvable with flat calibration because both types of frame are tampered with differently.
For camera models (see the link at Mark’s website for a list of some) that don’t have the option in the menu to use “lossless compression” (which solves the problem entirely for such cameras), there are only a few solutions. The first is dealing with it in post processing (PixInsight has a new impressive algorithm called gradientCorrection that can really beat down some stubborn gradients), however for advanced standards of imaging, trying to remove such artifacts after they’re baked in will always attenuate your desired signal somewhat too. This is always worse. Secondly, you can use Mark’s handmade “ring removal” tool to resolve it, which opens the RAW file, reapplies scaling factors that do not destroy the data like the Nikon algorithm does, and converts it to a DNG file that should be rid of the rings. This is a great option to help, although these factors are empirically derived and therefore the integrity of the original data is not perfect after doing so. Finally, you can make sure your light frames’ exposure level is low enough such that all background average ADU values fall below the first value at which this lossy binning problem starts occurring (973 for the D5300, for example). This requires careful planning on a target-by-target basis for what exposure time and ISO will be used, and the requirement may interfere with the second problem described next, which requires higher histogram exposure. It is also a pain because background levels can rise above the magic value during later times in the night as the target falls in the sky, on moonlit nights, and with varying light pollution. Although it works, this solution is far from ideal and sometimes unsustainably restrictive. The worst part is the flat frames have the same requirements to be void of the ring pattern, meaning you can’t expose them properly to use this fix!
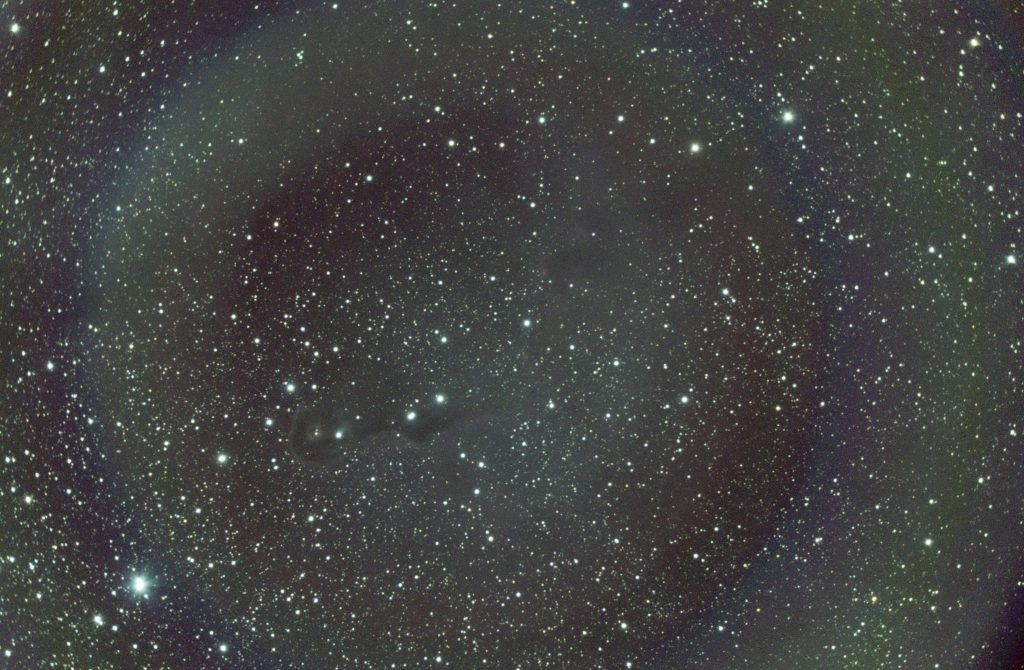
Here are some examples in my own images from awhile back that had these issues, taken long before I was aware of this problem. Consider this Elephant Trunk Nebula:
This is abysmal and unusable. Running the light frames through Mark’s color ring correction tool (see link previously) and reintegrating produces the following:
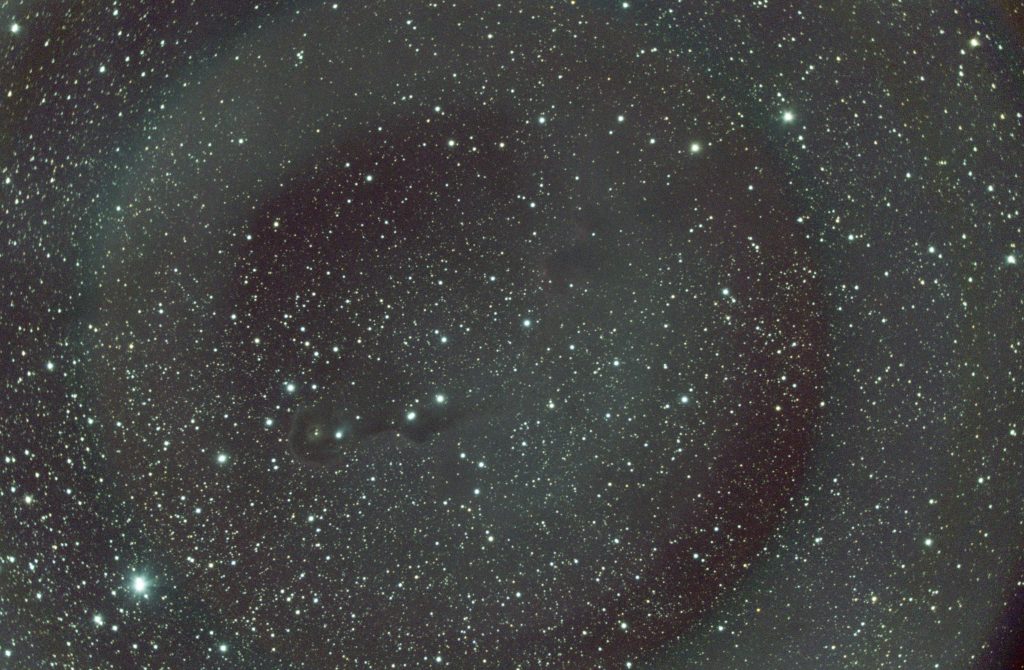
Notice how many of the (colored) rings are corrected, but not all! Now here is a recalibration and integration with the flat frames also thrown into the ring removal tool first:
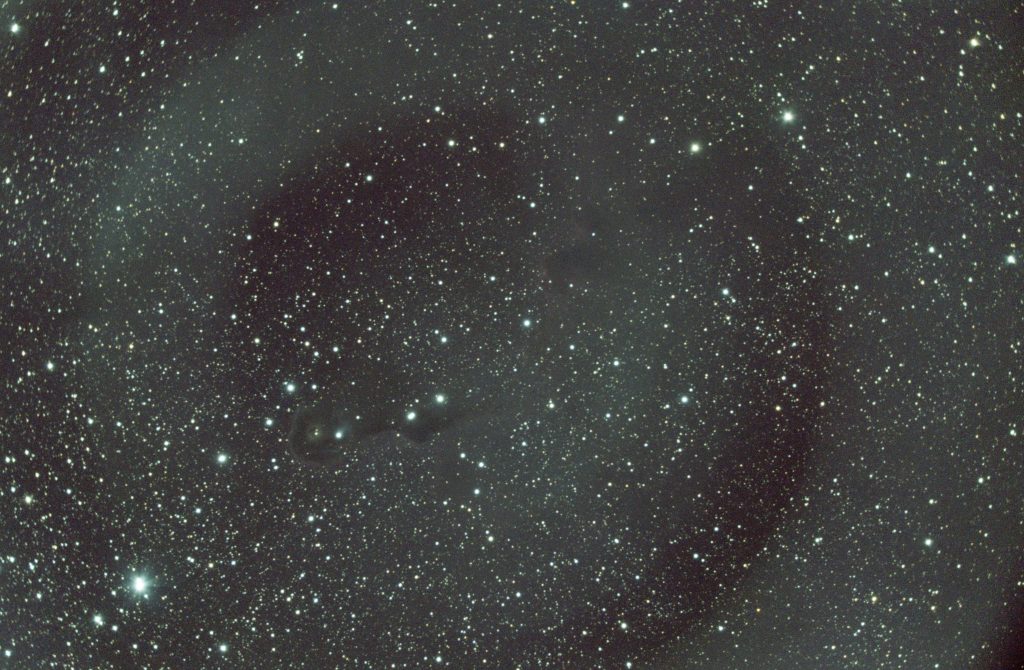
Notice how the only ringing that remains is NOT colored. The remaining garbage here is caused by something else (either the focal reducer I used at the time, or flat frames that had an unintentional change in the optical train before being taken- they were also underexposed!) that I cannot test anymore, because I no longer have that focal reducer, nor the exact optical train configuration. Ignoring the remaining colorless rings, however, notice how the COLORED ringing is fixed. Exposing this frame so the pixel values in the background averaged below 973 ADU likely would’ve saved this dataset (assuming I used properly exposed flat frames too). I wish I had a comparison with this dataset that doesn’t have the other issues so the point would be clearer, but I cannot fix this data without the focal reducer I originally used.
Also note that the fix incurred by using the ring removal tool is not a coincidence. The exact, empirically-derived factors used by this tool would completely ruin (probably by adding rings) any normal images that weren’t affected by this problem. At the least, it would nothing. If this very precise algorithm fixes an image, then it was indeed affected by this issue. It is statistically impossible to see the rings go away with such a specific algorithm implemented on data unaffected by this exact issue.
A Note on Focal Reducers
At this stage I should mention how I frequently blamed focal reducers for this ringing pattern, because logically, removing the focal reducer without changing anything else would resolve the colored rings altogether in multiple cases. However, discovering the above has proven that many of these ringing issues were actually Nikon’s fault! So why did the removal of the focal reducers often fix the problem?
Well, there are two carefully balanced contributions to the issue that lead to this deceiving result. First off, recall that the lossy compression algorithm only manifests rings because of vignetting; the radial falloff in light intensity leads to the histogram gaps producing circles of varying color in the image. Focal reducers generally increase vignetting, which indirectly worsens the chromatic rings when used, despite lossy compression by Nikon being the cause. Also, focal reducers increase the intensity of light seen at a given photosite by reducing the focal length of the optical train, thereby potentially bumping an image’s ADU values past the “bad” threshold (973 ADU for the D5300). That is, removing the focal reducer can lead to a histogram that peaks farther to the left, thereby avoiding the issue altogether as described above. But in such cases, the focal reducer was not to blame after all.
There are still some cases that don’t seem fully fixed by resolving the lossy compression issue (either with sufficiently low exposure lengths or with the ring correction tool), however, and in these cases I suspect the focal reducer also does cause some problems that are not correctable by flat frames. Also note that the flat frames themselves can introduce the problem when properly exposed, as dividing clean data with ring-laden flat frames will ruin the lights. Trying to expose the flats so insufficiently that they peak below the 973 ADU value is not generally acceptable.
As a result of all of this time wasting, however, I generally try to avoid focal reducers, the exception being the Starizona Focal Reducer placed on my 8se, which is very well-behaved. Also, my review of the Antares Focal Reducer for SCTs has been corrected in light of these recent discoveries on Nikon raw data tampering.
Additional Image “Correction”
There also exists a different modification from Nikon, likely to accommodate lenses and resulting radial color patterns, that causes similar-looking colored rings in the images for some people under certain circumstances. The nature of this correction is much less well understood, except that some cameras reliably produce it, whereas some (like the D5300) only do when a lens is attached. I have personally confirmed this in my own camera with the same test Mark describes on his page on this topic.
There is no way to disable this problem-causing correction, as the software is locked and closed-source, and the RAW data already contains the aberrant results. It also appears this problem has different presentations on a camera-by-camera basis among the same model, so no tool can be created to try and “undo” it. I posit that this algorithm is trained at the factory with some parameters that are determined empirically on each camera individually. So, to try and minimize its effects, one should expose the light (and flat) frames more than normal so that the fixed erroneous ADU values become a smaller percentage of the total at each pixel, thereby proportionally reducing it. This doesn’t remove it completely, however, meaning this artifact is technically permanent and unavoidable. If you also have the first problem above with lossy compression, then you can’t solve both problems simultaneously either! The necessary steps are directly contradictory to one another. You can try and buy a camera model that allows lossless compression and then expose more heavily to try and avoid both problems, however this is only masking a problem with the RAW data, and it is very restrictive with dynamic range and star bloat.
I haven’t had an image heavily affected by this problem that I know of (as I usually use the D5300 on a telescope and not a lens, so the correction is not “on” with this camera), however using Mark’s test I confirmed that my camera displays this behavior on all THREE color channels with the lens attached, even if the electronic contacts are taped over. Bummer! See his page on this issue for examples displaying it.
Other Unidentified Artifacts?
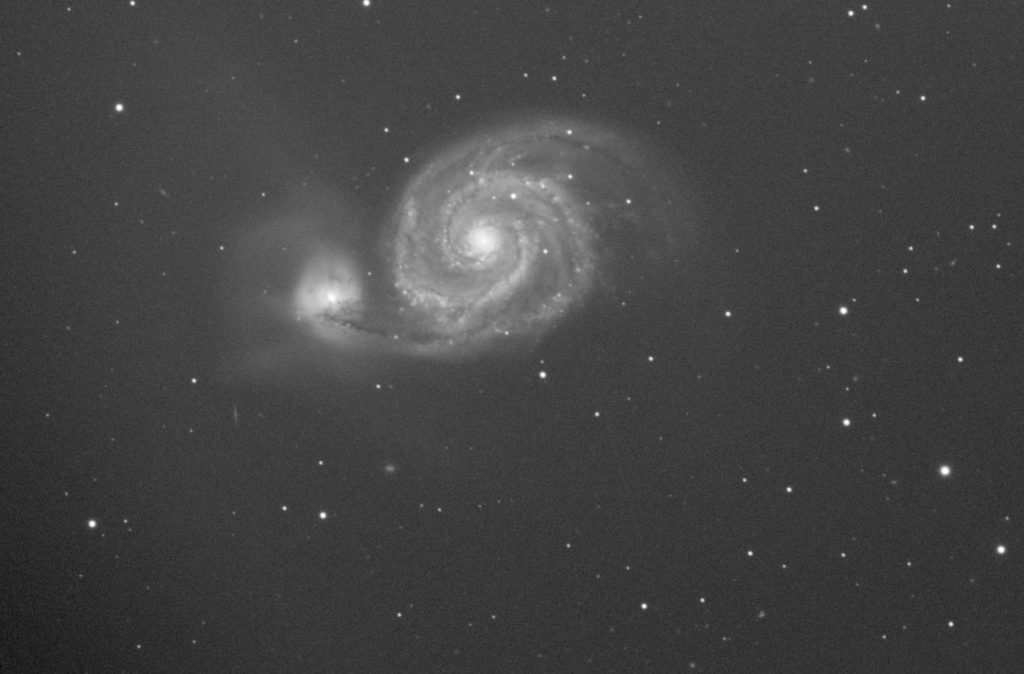
The dataset that made me give up on using Nikon for serious astrophotography, after years of doing so, was on M51 (the Whirlpool Galaxy). Notice the curved, green artifact that goes from the left center of the stack to the upper right corner of this stack (ONLY crop and backgroundNeutralization were applied here). Ignore the satellite and/or airplane trails that are very bright and obvious in the middle and upper right. Zoom OUT to see it easier, as it will fill less of your vision, and change your vertical angle around to aid seeing it:
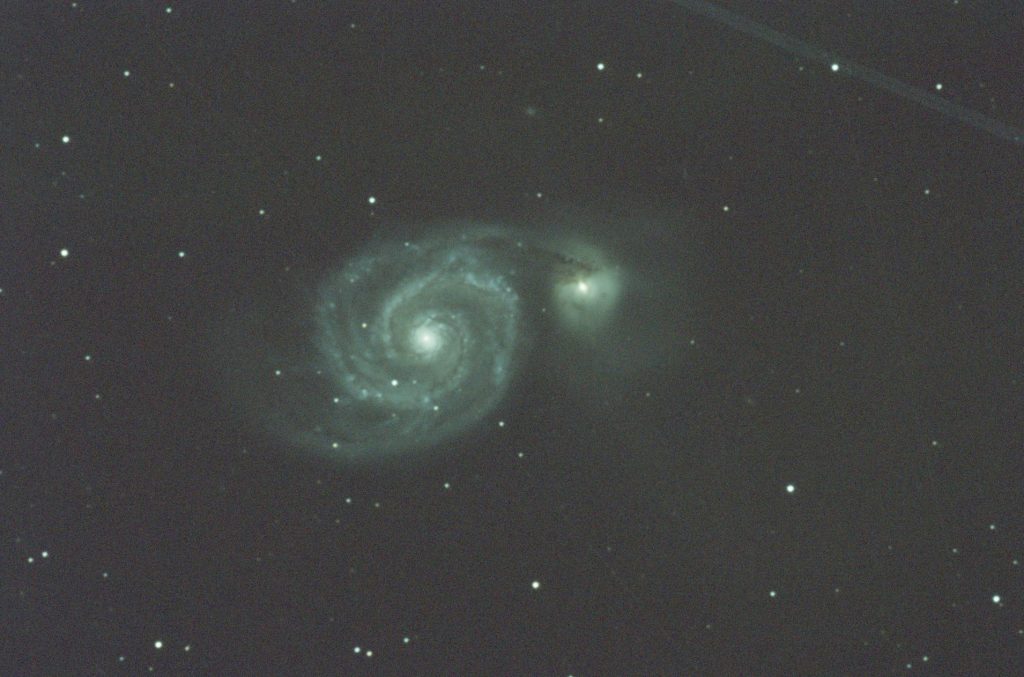
Don’t see it yet? Here’s just the green channel:
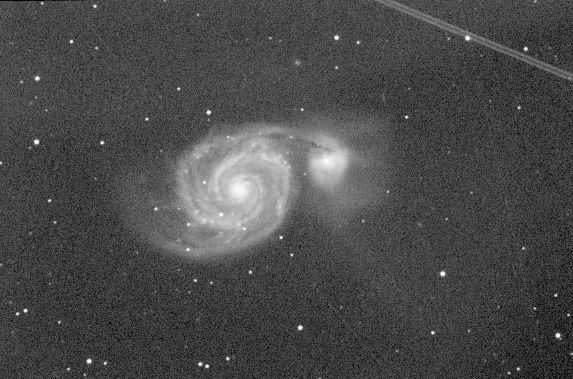
After spending about 30 hours troubleshooting different possible problems, including making sure I wasn’t being affected by either of the above problems with Nikons (vignetting usually leads to circular rings of color issues but wavy bands are also possible depending on the underlying gradients), rotating the optical train to track the effect, using Marks’ ring removal tool on all data, flocking the off-axis guider’s pick-off prism and then removing it from the optical train altogether (a reflection was suspected, but disproved when the artifact persisted without the stalk present at all), trying flats of various ISOs and exposures, and dancing in the moonlight, I finally got it to go away by simply taking the exact same data with the lights at ISO 3200 instead of 200, using the same flats as before. I did this immediately after taking more data at the old ISO to confirm the problem was still there. It was, and immediately taking more data (same total integration time) with no changes except the ISO of the lights eliminated the problem completely:
This methodology proves it is NOT the flat frames (same ones calibrated both sets), NOT the optical train in any way (only changing the ISO fixed it), and NOT the lossy compression issue (all background values were below the necessary 973 ADU value for this camera). I also took the data again at HI ISO, and it was still looking good (ignoring star saturation).
Therefore, in some unknown way, I believe Nikon is further messing with this RAW data. Perhaps more “corrections”, perhaps something compressive in nature, or even ISO imperfections (although 200 is generally considered safe with Nikon). The curved nature of the artifact suggested a diffuse reflection, but it is provably not.
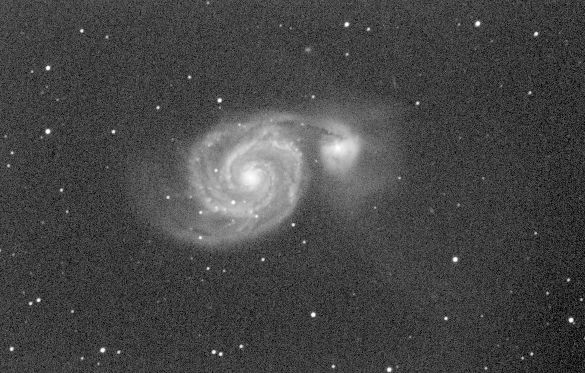
You might be wondering if the cooled astro camera fixed this problem, since the data is purely unaltered raw data. Yes, it did. Here’s the same target with the same optical train but the ASI2600MC camera instead, with ONLY a crop and a colorcalibration to set the white balance:
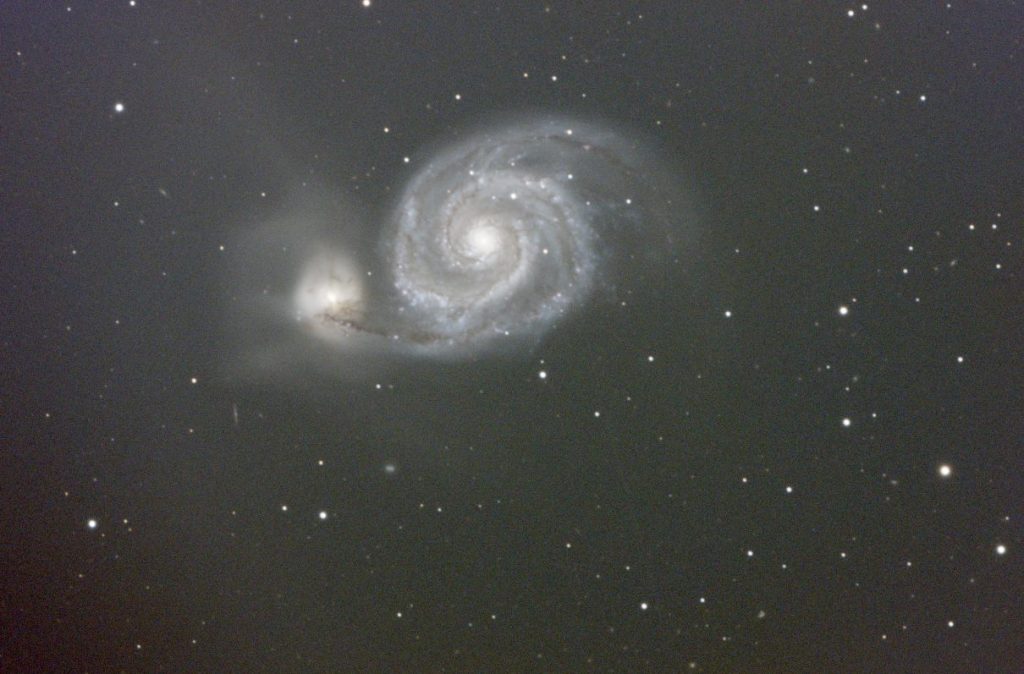
Now the green cast is normal (skyglow and higher green sensitivity through the Bayer matrix), but you’ll notice none of the artifacts shown before. Here is the green channel from this stack:
This field is insanely clean; I haven’t even extracted the background yet! The red and blue channels are even flatter. This camera also provides a hugely better SNR when compared to the same amount of data on the other dataset with the DSLR, but that’s another discussion.
Back to the DSLR, the artifact also doesn’t show up identically on other targets or areas of the sky, so it isn’t easily predictable behavior. However, in hindsight I’ve seen this sort of thing before. Consider this heavily downsampled stack of M101:
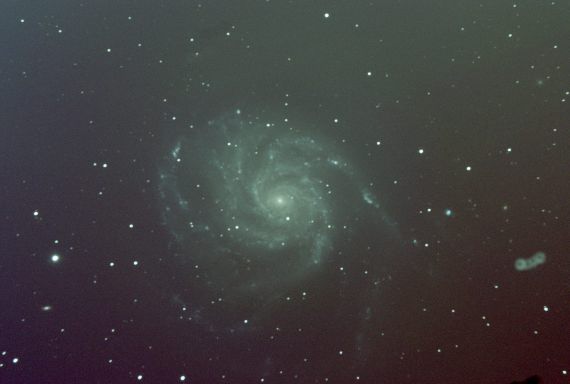
See the same sharp artifact in the upper right portion of this image? Ignore the dust overcorrection on the mid-bottom right and the other weird colors. Here’s the green channel, downsampled and contrast enhanced to show it more, at the 2 o’clock position moving from the corner to the center (ignore the dust motes on the top at 11 o’clock as well):
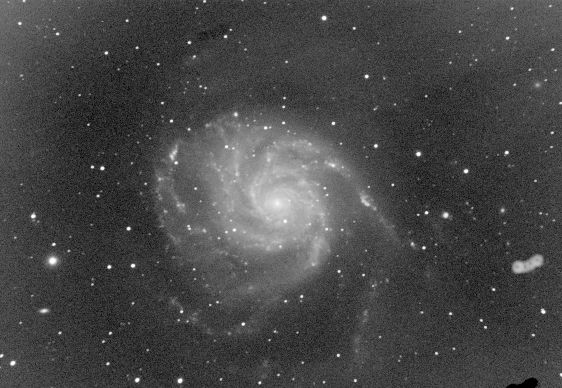
The red channel doesn’t have it!
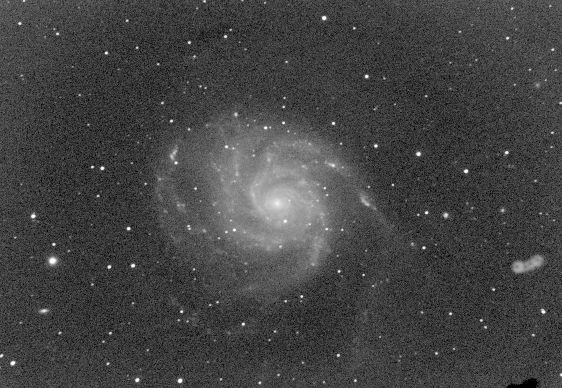
Any ringing from the lossy compression has been removed with the tool on this data. Whatever causes this, it is completely impossible to deal with before it ends up in the image…
Thinking back, here’s another example that showed impossible behavior not dissimilar from above. This was a waste of almost thirty hours of integration on the Cat’s Eye Nebula. To be fair, this is a hard target in light pollution, so faint detail would’ve been tough to show anyways, however this is not saturation boosted…
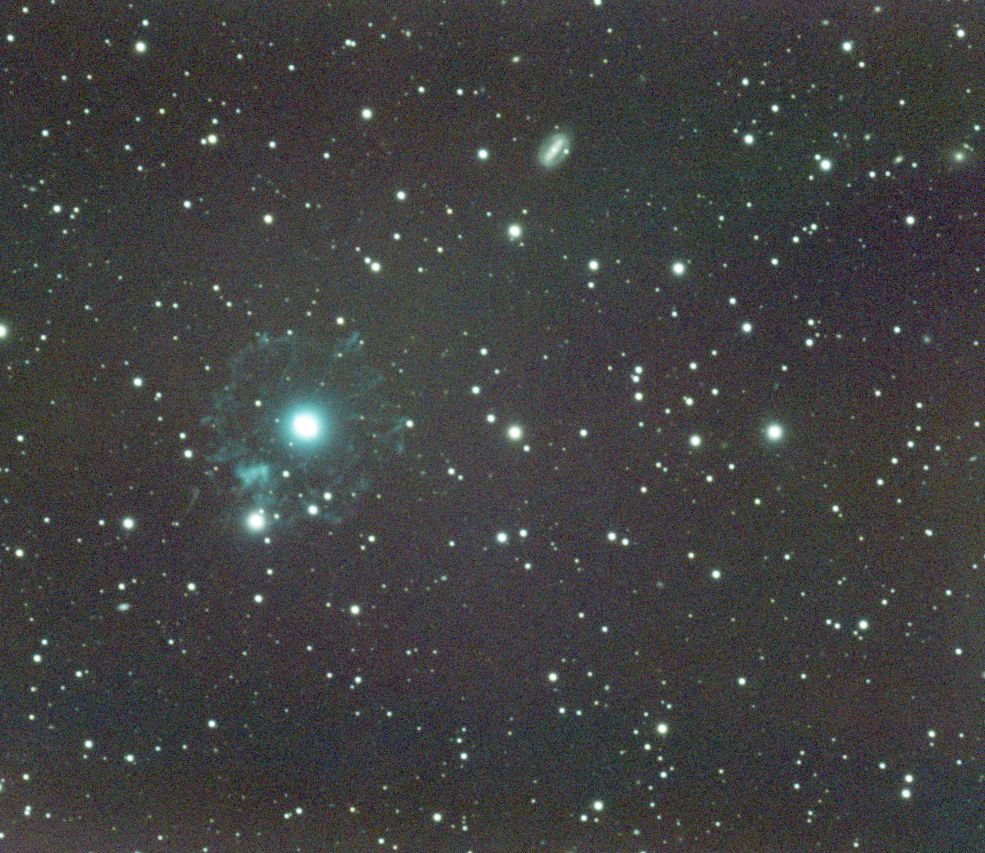
A green cast is typical because of skyglow and a higher sensitivity on the Bayer matrix to green light, but still, what is with these patterns and artifacts in the green channel? It’s not a uniform cast, but rather an assortment of weird edges and curves throughout (the presence of multiple in this image is likely because this stack occurred at many different optical train angles so they occurred in different spots on different nights- however, a crop was applied to include a FOV where data existed on all nights so no edge artifacts are present). These sharp edges are hard to remove with processing software, but it is also detrimental to the faint detail I’m trying to maintain.
My newest work with the ASI2600MC is completely free of these problems.
Conclusion
So what’s the deal with using Nikons (and other brands of DSLR or mirrorless) for astrophotography? Well, for advanced work, they’re essentially unusable for reasons that skill cannot overcome. Tampering with the RAW data occurs in at least two different ways in some cases, producing colored rings and other artifacts that are very hard to deal with in post-processing, particularly when they have sharp edges. There are some techniques to try and prevent or mitigate these shortcomings, however they are very hard to implement perfectly in practice. I gave up on the DSLR after years of work chasing gremlins once I worked out most other aspects of my imaging process because I reached a wall; with a perfect process, something was still going on at the camera level that was unavoidable (see M51 above) and I could no longer improve my work with this encumbrance.
Of course, I still made some decent images with this camera before all of these issues became the bottleneck in the process, so intermediate-level work is still possible, albeit unpleasant. Laying hundreds of background sample boxes in PixInsight’s dynamicBackgroundExtractor was never fun and always left the image splotchy in the color space because of the required aggression (notwithstanding the newer and better gradientCorrection process).
It is generally easier to deal with some artifacts at lower focal length, so they can also be used for those applications, beginner work, and with lenses. Be prepared for some of these issues even in those images too, however, in addition to the many intrinsic disadvantages of DSLRs like higher read noise and lower QE (sometimes). The cooling of a dedicated camera is also indispensable and eliminates the need to take dark frames during the capture evening, as temperatures are carefully regulated.
There are some additional problems which have plagued other brands as well, such as star destruction, banding, and split-sensor artifacts. Canon cameras are hardly a reliable alternative, with their higher read noises and, to the best of my knowledge, some pre-RAW processing also.
In short, although workable, be very wary of potential problems when using Nikon (and other) DSLRs for more advanced astrophotography. I’d go so far as to say if you know you want to reach an advanced level at some point, skip them altogether unless you already own one. Let my hundreds of hours of experience diligently troubleshooting them save you some time.
2 thoughts on “Using Nikon DSLRs for Astrophotography?”